
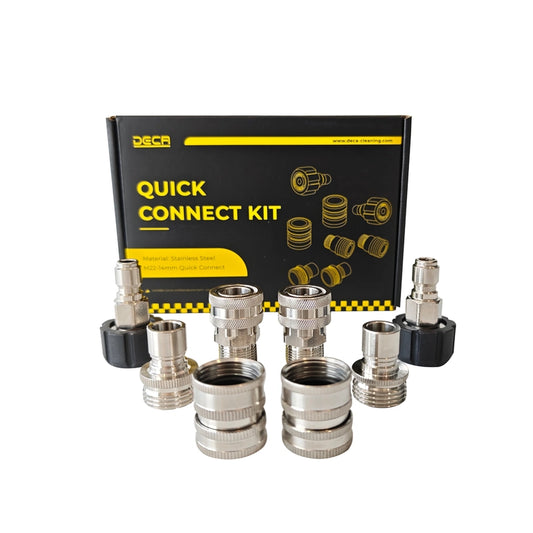

Switching pressure-washer accessories should not require tools every time. A quick-connect kit makes it easier to attach or remove the spray gun and high-pressure hose, helping you spend less time on setup and more time cleaning.
In this guide, we will explain the fittings shown in the DECA installation video and walk you through the connection process step by step.
What Is a Pressure Washer Quick Connect Kit?
A pressure washer quick-connect kit converts threaded connections into push-to-connect fittings. Once installed, the plug slides into the coupler and locks in place. This creates a faster and more convenient connection between the pressure washer gun and hose.
The kit shown in the video includes:
3/4-inch male adapter
3/4-inch female adapter
1/2-inch plug
1/2-inch quick-connect coupler
The threaded side attaches to the pressure washer component, while the plug and coupler form the removable connection.
Important: Connector sizes and thread types can vary between pressure washer models. Check your gun, hose and accessory specifications before installation.

Before You Begin
Always turn off the pressure washer, disconnect the power supply and shut off the water source before working on any connection. Squeeze the spray-gun trigger to release trapped pressure.
You may also need:
Thread-seal tape suitable for pressure-washer fittings
A suitable wrench
A clean cloth
Inspect the threads, O-rings and sealing surfaces before assembly. Replace any damaged or missing seal before use.
Step 1: Identify the Correct Fittings
Match each adapter to the corresponding threaded connection on the spray gun or hose.
Do not force fittings together. If an adapter does not thread on smoothly by hand, stop and check the diameter, thread direction and thread type. A fitting with the correct diameter may still use an incompatible thread standard.
Step 2: Install the Adapter on the Pressure Washer Gun
Wrap thread-seal tape around the male threads if the connection design requires it. Keep the tape away from the first thread so loose material does not enter the water path.
Thread the correct adapter onto the inlet of the pressure washer gun by hand. Once it is seated correctly, tighten it securely with a wrench. Avoid overtightening, which may damage the threads, fitting or gun inlet.
Step 3: Install the Matching Adapter on the Hose
Attach the matching quick-connect fitting to the end of the high-pressure hose. Start the connection by hand to prevent cross-threading, then tighten it securely.
Make sure the plug and coupler face each other correctly when the gun and hose are brought together.
Step 4: Join the Quick-Connect Fittings
To connect the gun to the hose:
1.Pull back the collar on the quick-connect coupler.
2.Push the plug fully into the coupler.
3.Release the collar.
4.Gently pull on both sides to confirm that the connection is locked.
The plug should not slide out when lightly pulled. If it does, reconnect it and make sure it is fully seated.
Step 5: Check for Leaks
Reconnect the water supply and slowly pressurize the system. Inspect both threaded joints and the quick-connect point.
If you see a leak:
Turn off the machine and water supply.
Release all trapped pressure.
Check that the fitting is fully tightened.
Inspect the O-ring for damage, twisting or incorrect placement.
Confirm that the adapters use the correct thread type.
Reapply thread seal only where appropriate.
Never adjust a fitting while the system is pressurized.
Common Installation Mistakes
Mixing Incompatible Thread Types
Matching diameters do not always mean matching threads. Forcing an incompatible fitting can permanently damage both components.
Cross-Threading
Always begin threaded connections by hand. If you feel strong resistance immediately, remove the fitting and realign it.
Forgetting to Lock the Coupler
After releasing the collar, perform a light pull test. This simple check helps prevent the hose from disconnecting when pressure builds.
Using a Damaged O-Ring
A worn, flattened or cut O-ring is a common source of leaks. Replace it with the correct size and material.
Working on a Pressurized System
Pressure may remain inside the hose even after the machine is turned off. Always squeeze the trigger to relieve pressure before disconnecting any fitting.
Why Use Quick-Connect Fittings?
A properly installed quick-connect kit offers several practical advantages:
Faster gun and hose installation
Easier accessory changes
Less repeated threading and unthreading
A cleaner, more convenient equipment setup
Reduced setup time before each cleaning job
Quick-connect fittings are especially useful for users who frequently change spray guns, hoses or other compatible accessories.
Final Check
Before cleaning, confirm that every threaded fitting is secure, the coupler collar has returned to its locked position and there are no visible leaks. A few seconds of inspection can help protect the fittings and keep your pressure-washing setup operating smoothly.
With the correct adapters and installation method, connecting a pressure washer gun to a high-pressure hose becomes quick, secure and straightforward.


